WP Verify Machine Plugin
Site Verification User Guide
Google Search Console Verification
Step #1: Visit the Google Search Console here: https://search.google.com/search-console/ownership
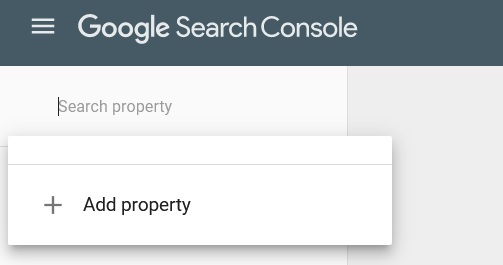
Step #3: A Popup will show up, select URL Prefix and enter your WordPress site URL there (include http:// or https://)
Step #4: The Console will then give you several ways to verify your website, select HTML Tag and copy the content part of the meta tag
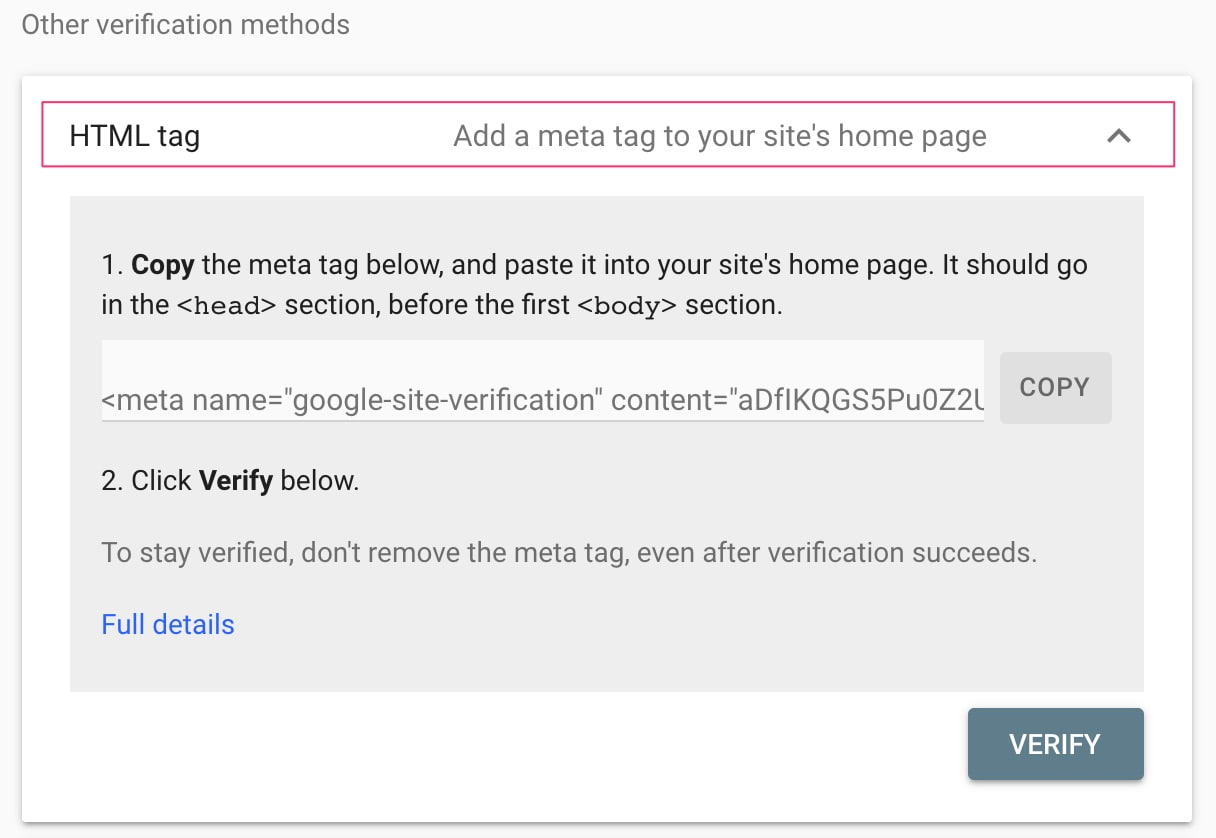
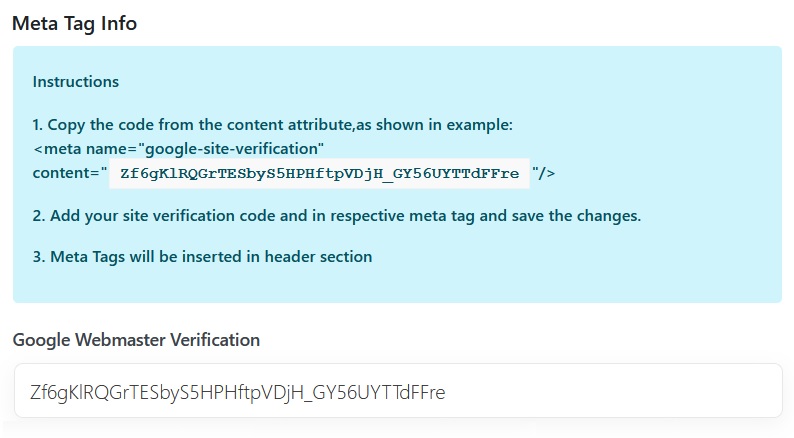
Step #5: Visit your WP Admin Dashboard -> Verify Machine. Then paste the meta tag content into the plugin setting and click the Save Changes button.
Step #6: Go back to Google Search Console and click 'Verify'.
Then congratulations, your website is now verified at Search Console and Google can now gives you an incredible amount of information about how your site is doing in their search result.
Bing Webmaster Tool Verification
Step #1: Log in to Bing with with your Microsoft Account here: https://www.bing.com/toolbox/webmaster
Step #2: Bing will provide an option to import your websites from Google Search Console, or Add Site Manually. You can go for Google Search Console Import (GSC) and no further steps needed (no need to do the Step #3 - #6)

Step #3: If you choose to Add Site Manually then enter your WordPress site's URL and click Add.
Step #4: On Verification Method, select HTML Meta Tag and copy the content part of the meta tag.
Step #5: Visit your WP Admin Dashboard -> Verify Machine. Then paste the meta tag content into the plugin setting and click the Save Changes button.
Norton SafeWeb Verification
Step #1: Visit Norton SafeWeb here: https://safeweb.norton.com/ and Sign In or Create a New Account there.
Step #2: In the top-right corner, click your profile name, and then click My Profile.
Step #3: In your Profile page, navigate to the Site Dispute tab, click Add Site button and enter your site URL.
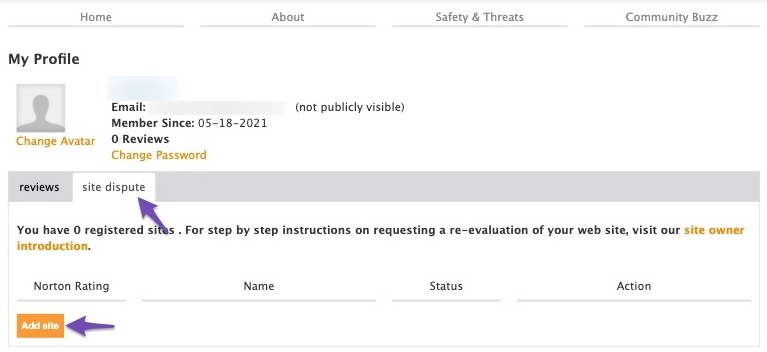
Step #4: Once your site is added, click the Verify your site option and choose Meta Tag among the verification methods. Then, copy the content part of the meta tag.
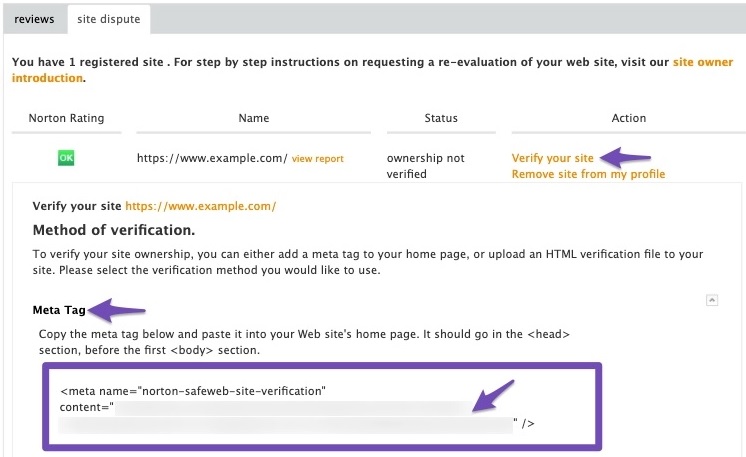
Step #5: Visit your WP Admin Dashboard -> Verify Machine. Then paste the meta tag content into the plugin setting and click the Save Changes button.
Pinterest Verification
Step #1: Log in to Pinterest or Create a New Account here: https://www.pinterest.com/.
Step #2: Convert your Account into a Free Business Account here: https://www.pinterest.com/business/create/.
Step #3: On the Website option, select Yes and enter your website URL there. Then click Next.

Step #4: Once all is finished, visit this link: https://www.pinterest.com/settings/claim, and click the Claim button on the Website option.

Step #5: Copy the content code from the HTML tag (don't click the Continue button yet)
Step #6: Visit your WP Admin Dashboard -> Verify Machine. Then paste the meta tag content into the plugin setting and click the Save Changes button.
Yandex Webmaster Verification
Step #1: Log in to Yandex or Create a New Account here: https://passport.yandex.com/registration
Step #2: Once you're logged in, click the plus sign button to add your website. Enter the full URL for your site in the box (include https:// or http:// too) and click the Add button.
Step #3: Next, you'll see a screen that says Verify rights to, select Meta Tag and copy the content part.
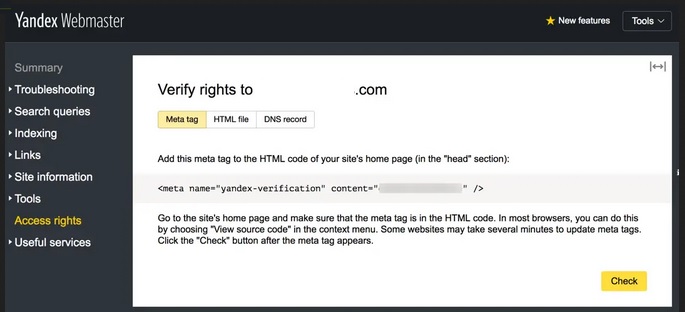
Step #4: Visit your WP Admin Dashboard -> Verify Machine. Then paste the meta tag content into the plugin setting and click the Save Changes button.
Baidu Webmaster Verification
Baidu Ziyuan (Baidu Webmaster Tools) identifies and recommends critical SEO best practices and solutions unique to your site to improve your visibility on the most-used search engine in China.
Browsing Baidu website will be like some alien-thingy because the website only available in Chinese language..
.. However Baidu is your only chance to get high-quality traffic from China's behemoth population because Google and Bing are almost non-existent for China audience.
Thus keep in mind that you might need a different browser other than Google Chrome for site submission, because once again: Google, Facebook, etc are not welcome in China and Chrome browser is from Google.
DANGER NOTICE: Verifying your website at Baidu is like a double-edged sword.
Because as said earlier, browsing Baidu website is difficult because it's only available in Chinese language.. But the real danger is the China's 1 Billion+ audience traffic which can melt even a Dedicated Server within minutes! Moreover, China's traffic is giga-huge but don't convert too much because their people prefer to shop at Alibaba..
Step #1: Register for a new Baidu Webmaster Tools account here: https://passport.baidu.com/v2/?reg
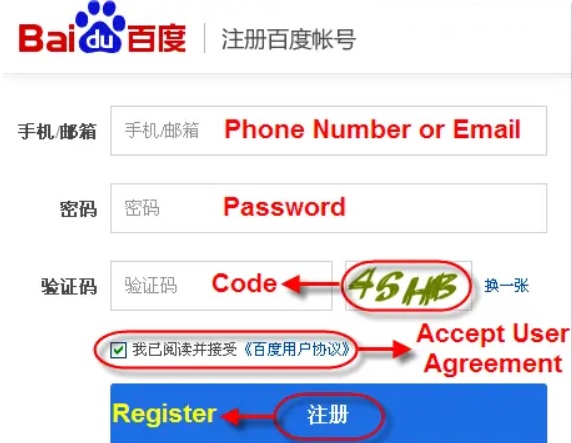
Step #2: As shown in the above picture enter email id, password for your account, verification code displayed, accept Baidu user agreement and click on the register button.
You will receive a success message saying that the verification mail has been sent to your email id. You can also choose mobile number as a user id for registration if you are residing at China having local phone number.
Note: Sometime Baidu asks for SMS verification if it suspects a spam registration. You can get SMS verification code on your own mobile number by choosing the country from the drop-down. After clicking the verification email sometimes you may need to enter the verification CAPTCHA code in simplified Chinese characters. Use Google translate handwrite option to enter the characters using mouse and then copy/paste the actual character in the verification form.
Step #3: Activate your account by clicking the confirmation link received in your email and log in to Baidu Webmaster Tools account here: https://ziyuan.baidu.com/login/index?u=/site/index

Step #4: As shown in the picture above, choose normal login option, enter your email id, password and click on the submit button to login to your account. Remember to enter mobile number as user id if you have registered using your mobile number in the previous step.


Step #7: Visit your WP Admin Dashboard -> Verify Machine. Then paste the meta tag content into the plugin setting and click the Save Changes button.
NOTE: You do not need to do all the 6 website verification above. My recommendation is the Google, Bing, Norton, Yandex and Pinterest verification.
Copyright © WpThemePlugin. All Rights Reserved.