WP MovieNews DFY Site Access
Member Support: https://wpthemeplugin.zendesk.com
STEP #1:
Install WordPress on your domain
STEP #2:
Install the free All-In-One WP Migration from Plugins -> Add New.
STEP #3:
Activate the plugin.
STEP #4:
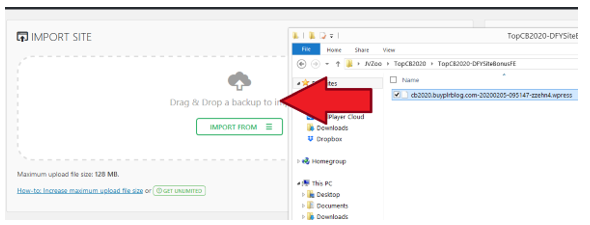
Visit All-In-One WP Migration menu -> Import
STEP #5:
Import the WP Movie News .wpress file to All-In-One WP Migration -> IMPORT menu (drag the file to the upload section)

STEP 6:
Click Proceed until the import and file installation finish.
STEP #7:
Once the file installation is completed, visit any link on your WP Admin dashboard. You will then be asked to relogin.
STEP 8:
To relogin, use these credentials -> Username: movienews Password: movienews87!!
STEP 9:
Installation is completed! Now you can customize the site.
STEP #1:
Go to Users menu -> Your Profile. Then change the default WP email address to your own email address.
Visit your email inbox and confirm your email.
STEP #2:
Go to Settings menu -> General. Then change the default WP email address to your own email address.
Visit your email inbox and confirm your email.
STEP #3:
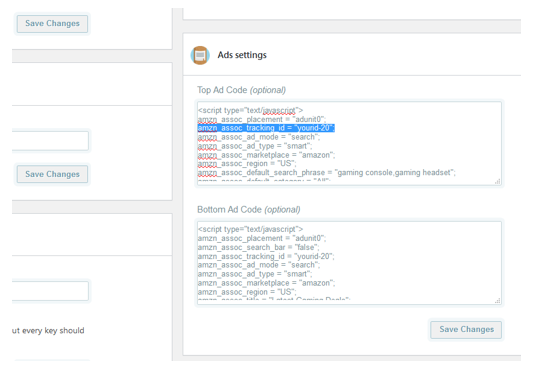
Visit WP Automatic menu -> Settings.
STEP #4:
Locate the Ads Settings, and find this code: amzn_assoc_tracking_id = “yourid-20”;

Replace yourid-20 with your own Amazon associate ID, both for the Top Ad Code and Bottom Ad Code.
Then hit Save Changes.
STEP #5:
Visit WP Automatic menu -> All Campaigns.
STEP #6:
Edit all campaigns, then set it to Publish.

Problem:
After installation, my website doesn’t have featured post on the homepage?
Answer:
Head over to Post -> All Posts, edit the post you want to be featured on the homepage, then click the “Featured this Post” option.
Problem:
I want to change site logo, colors, etc?
Answer:
Simple! Visit Appearance -> Customizer. Then you can change site logo, customize the site options, colors and many more.

