STEP #1:
Install WordPress on your domain
STEP #2:
Install these two plugins to your WP site from Plugins -> Add New -> Upload.
All In One WP Migration Plugin
All In One WP Migration File Extension.
STEP #3:
Activate both of those plugins.
STEP #4:
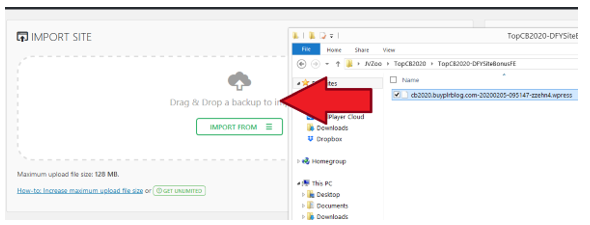
On your WP site dashboard, visit All-In-One WP Migration menu -> Import
STEP #5:
Import the medicalnews .wpress file from your purchase file to your WP site (drag the file to the upload section)

STEP 6:
Click Proceed until the import and file installation finish.
STEP #7:
Once the file installation is completed, visit any link on your WP Admin dashboard. You will then be asked to relogin.
STEP 8:
To relogin, use these credentials -> Username: medicalnews Password: medicalnews2021
STEP 9:
Installation is completed! Now you can customize the site.
STEP #1 :
*IMPORTANT* Go to Users menu -> Your Profile. Then change the default WP email address to your own email address.
After that visit your email inbox and confirm your email.
STEP #2:
*IMPORTANT* Go to Settings menu -> General. Then change the default WP email address to your own email address.
After that visit your email inbox and confirm your email.
STEP #3:
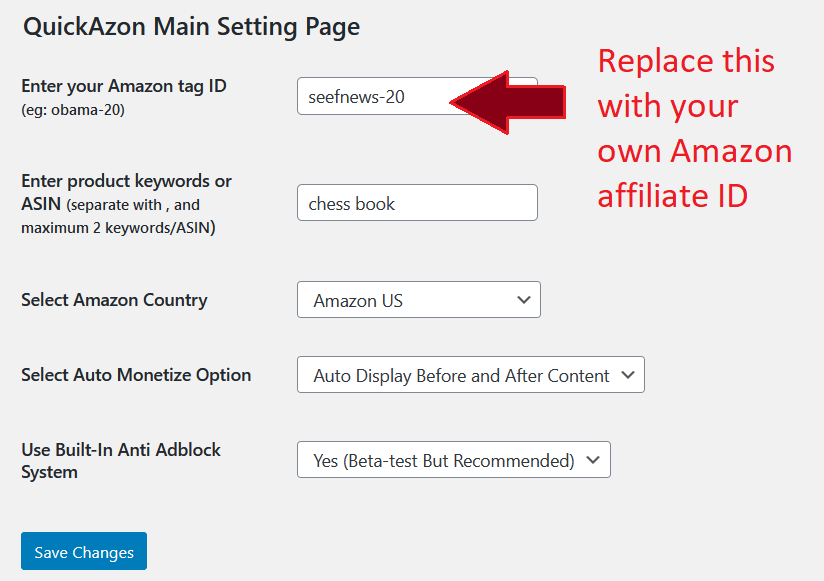
Visit Settings -> WP QuickAzon menu.
STEP #4:
On the WP QuickAzon setting page, replace the default Amazon tag ID with your own Amazon affiliate tag ID.

Then hit Save Changes.
Activating The Automated Content Module
STEP #1:
Visit WP Automatic menu -> Settings.
STEP #2:
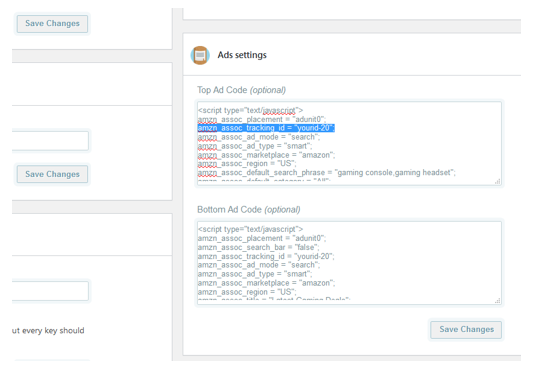
Locate the Ads Settings, and find this code: amzn_assoc_tracking_id = “yourid-20”;

Replace yourid-20 with your own Amazon associate ID, both for the Top Ad Code and Bottom Ad Code.
Then hit Save Changes.
STEP #3:
Visit WP Automatic menu -> All Campaigns.
STEP #4:
Edit all campaigns (click Edit), then set it to Publish.

Question:
After installation, my website doesn’t have featured post on the homepage?
Answer:
Head over to Post -> All Post. Edit the post you want to be featured, then select the “Featured This Post on Homepage” option. Then go to Appearance -> Customize, then enable the “Display featured content on homepage” option.
Question:
After installation, my WP posts and page returns 404?
Answer:
If this problem comes, visit Appearance -> Permalinks. Then select “Month and Name” on the Permalink Settings, after that click Save Changes.
Question:
I want to change site logo, colors, etc?
Answer:
Simple! Visit Appearance menu -> Theme Options. Then you can change site logo, customize the site options, colors and many more.
Question:
How to add Advertisement on Header?
From WP Admin visit Appearance menu -> Widgets-> Header Advertisement and >> Add Widget. Then visit Appearance menu -> Customize, select Widgets -> Header Advertisement -> then add your banner/advertisement on the field.
Thank you & have a good one!

Leo (WpThemePlugin.com)
** Bonus Guide For Advanced Users **
Make Your WP Chess Website To Post Article/Content Everyday On Autopilot
Though it is possible to make your WP Chess Website to autopost chess-related content everyday using WP Automatic Plugin below, but I recommend to not using auto-content plugin. It's better to just grab content from other website and rewrite the article manually.
Why?
First, because for this website we want to build authority niche site, not an auto-content site.
Second, most articles from ANY automated/autorewriter plugin are less readable.
Third, buyers at Flippa or other website flipping marketplace tend to not liking websites built with autocontent/autorewriter plugin.
Nevertheless, autocontent plugin can be really helpful to build profitable niche sites in the hands of advanced users.
So below I make a guide on how to use WP Automatic plugin so your WP Chess Website can autopost content every day on autopilot.
BEWARE: FOLLOW THE GUIDE BELOW AT YOUR OWN RISK. I ONLY PUT THIS GUIDE AS AN UNADVERTISED BONUS, ANY FAIL ATTEMPT DUE TO FOLLOWING THE GUIDE BELOW WILL NOT BE COVERED BY OUR 30 DAYS MONEY BACK GUARANTEE - USE AT YOUR OWN RISK!
Brought to you by WpThemePlugin.com


