Video User Guide:
NOTE: Even though the video guide title says NFTStock WP site, but the installation steps is the same as this laptop site!
STEP #1:
Install WordPress on your domain
STEP #2:
Install these two plugins to your WP site from Plugins -> Add New -> Upload.
All In One WP Migration Plugin
All In One WP Migration File Extension.
STEP #3:
Activate both of those plugins.
STEP #4:
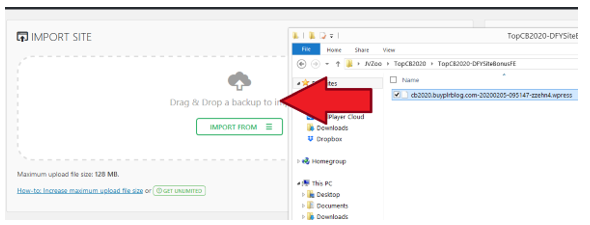
On your WP site dashboard, visit All-In-One WP Migration menu -> Import
STEP #5:
Import the WP4Laptop .wpress file (drag the file to the upload section)

STEP 6:
Click Proceed until the import and file installation finish.
STEP #7:
Once the file installation is completed, visit any link on your WP Admin dashboard. You will then be asked to relogin.
STEP 8:
To relogin, use these credentials -> Username: wp4laptop Password: wp4laptopadmin
*NOTE: if password incorrect try this: wp4laptopadmin$$
STEP 9:
Installation is completed! Now you can customize the site.
STEP #1 :
*IMPORTANT* Go to Users menu -> Your Profile. Then change the default WP email address to your own email address.
After that visit your email inbox and confirm your email.
STEP #2:
*IMPORTANT* Go to Settings menu -> General. Then change the default WP email address to your own email address.
After that visit your email inbox and confirm your email.
STEP #3:
Visit WP Automatic menu -> Settings.
STEP #4:
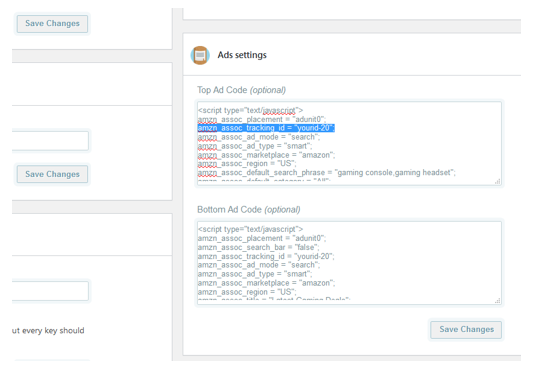
Locate the Ads Settings, and find this code: amzn_assoc_tracking_id = “yourid-20”;

Replace yourid-20 with your own Amazon associate ID, both for the Top Ad Code and Bottom Ad Code.
Then hit Save Changes.
STEP #5:
Visit WP Automatic menu -> All Campaigns.
STEP #6:
Edit all campaigns, then set it to Publish.

Problem:
1.) WP Automatic requires Purchase Code to autopost article.
2.) New posts don’t show Image on Homepage.
Answer:
1) Download the latest version here:
https://newsblogempire.s3.amazonaws.com/RequiredTools/wp-automatic.zip
2) Visit WP Admin -> Plugins, then deactivate WP Automatic from there
3) Delete WP Automatic plugin
4) Install and activate the latest version above from Plugins -> Add New -> Upload
Problem:
After installation, my website doesn’t have featured post on the homepage?
Answer:
Head over to Appearance menu -> Theme Options, then select any Category you want to be featured on the homepage.
Problem:
I want to change site logo, colors, etc?
Answer:
Simple! Visit Appearance menu -> Theme Options. Then you can change site logo, customize the site options, colors and many more.
The Store Section in WP4Laptop is using ShopPage WP plugin.
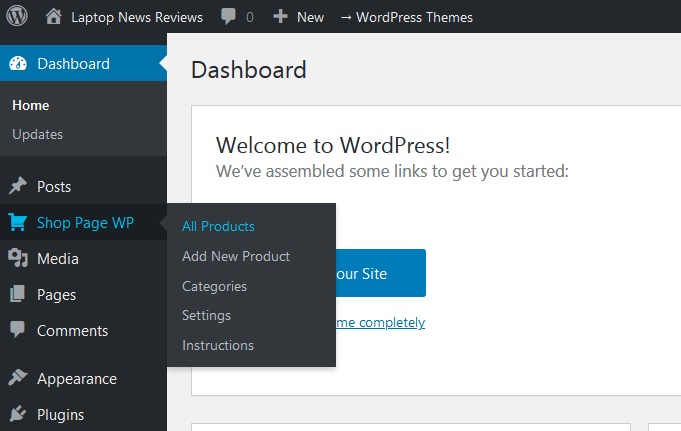
To edit the affiliate link for each products, from WP Admin Dashboard head over to ShopPage WP menu -> All Products.

Then edit the product post, and replace the default Amazon affiliate ID with your own ID:
To add new products, just visit ShopPage WP menu -> Add New Product.
Then fill in the affiliate link and also upload image for the product from Featured Image section.

This WP4Laptop site package is also capable to autopost news article with the help of WP Automatic plugin that already preinstalled.
However I don’t recommend to use WP Automatic plugin as it is.
It’s better whenever new article has been posted automatically, you edit that article to check if there was any formatting issue, etc.


